A Better Mousetrap!


This mousetrap design was used by my uncle decades ago, when his graduate students were studying territorial behavior of rodents in Iowa and Wisconsin. As I recall, they used hundreds of such traps, and caught tens of thousands of mice. When I was a kid, we did something similar in grade school after our teacher took interest in his methods.

I hadn't revisited this for at least 25 years, and then it happened. An infestation in our home. It was absurd, and my wife was going nuts.

I could have poisoned or otherwise killed the things, but I figured it'd be more fun (especially for my youngest children) to catch 'em live and release 'em in an appropriate wild area (though based on what my uncle learned, this is all pointless ;-)

So I made several of these traps, and in a few days we'd caught 8 juveniles and 1 adult (forgot to check whether it was a female). Over the next couple weeks, we caught nearly 30 mice. Sheesh.

However, some of the juveniles (I presume) managed to lick all the bait off the trigger with impunity! Therefore, I reasoned that something novel must be done to force them to apply more force -- sufficient force -- in order to trip the trap reliably. The innovation that seems to have done the trick is the skewer scrap, and I've included that in the assembly instructions.

I'd be interested to hear from anyone who uses these instructions, innovates, or whatever. Heck, email just to tell me how many mice you've caught. If you use a rat trap version with a five gallon bucket to catch the cats that've been crappin' in your kids' sandbox, email me about that, too.   ;-)

Please check your traps every day. If you anticipate catching juvenile mice, check them even more frequently. Mice will quickly dehydrate and suffer badly; you'd be kinder to snap their backs with a normal trap than to neglect them once they're caught. (hat tip to Amy R.)

I have other gizmos you can check out, too -- such as the Hyperlite Finger Stove.

* Note:  Do not get a mousetrap that has yellow plastic bait trays. Get conventional, old fashioned mousetraps. You'll need:
  • coffee can
  • 1/4" screen
  • mousetrap*
  • old scissors or diagonal cutter
  • slip-joint pliers and/or needle nose pliers
  • bamboo/wood skewers (from the grocer)
  • small screws
  • screwdriver
  • light wire
  • glue
  • light drill
  • cunning and dexterity
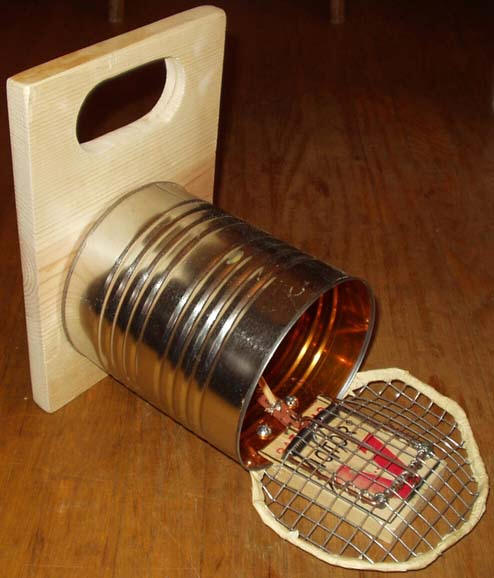
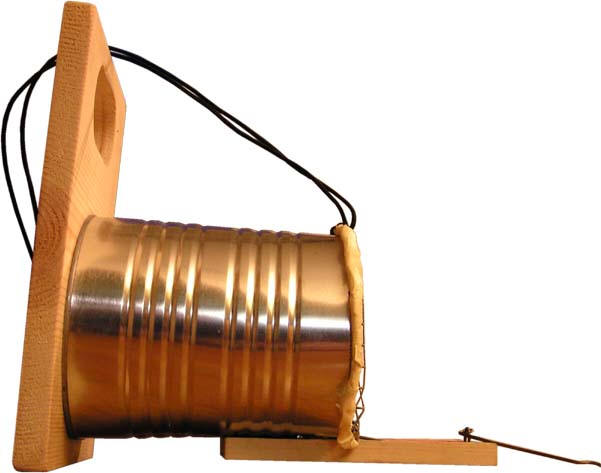
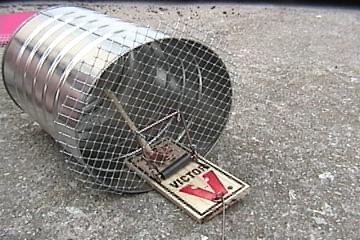
You're going to be mounting a mousetrap to the open end of a coffee can as shown, so that the hinge is right at the top edge of the can.
You can use two or three small screws to do this, as shown.
By pressing the trap against the partially driven screws, you can easily mark the trap for drilling pilot holes. You'll need these to avoid splitting the wood when driving the screws.


Simple enough.
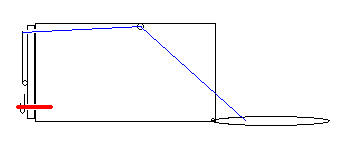
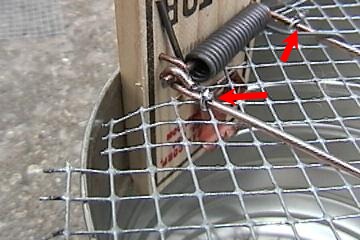
Before mounting the trap to the can, you're going to bend the bait/trigger loop out of shape a bit.

Note: Don't bend anything outside the yellow ellipse, if you can help it. Otherwise, you'll have to perform some painstaking tweaking of the trigger when you've finished the trap. 

Your goal is to open up the curl, so that...

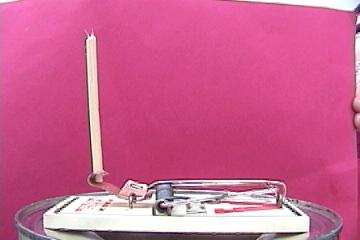
...when the trap is set, a length of the skewer will stand straight up in the hole, with a tight fit.

You'll put the skewer piece in later.

Once you're content that you haven't screwed up the trap's trigger with all this bending, press a drop of glue into each hole, and mount the trap to the can.

Note: It's also possible to do the following steps before mounting the trap to the can; it's a matter of whatever's most convenient for you.

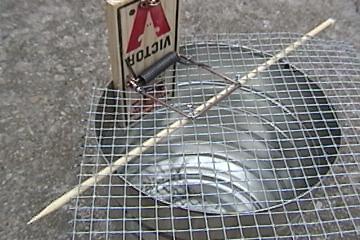
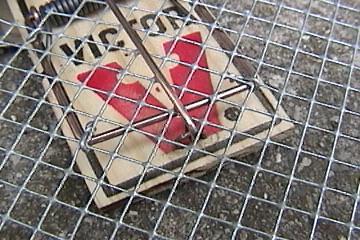
Place a piece of screen under the snapper as shown. I'm using a skewer to keep the spring of the trap from bending the screen until it's attached.

Note: On this particular trap I mounted the screen at a 45 degree angle; usually I've mounted it so the warp and woof run parallel and perpendicular to the surface of the trap. Whatever catches your mouse will work fine.

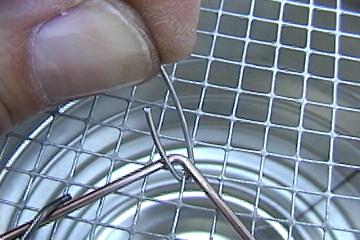
Use light wire to attach things. Twist it tightly with a pliers.
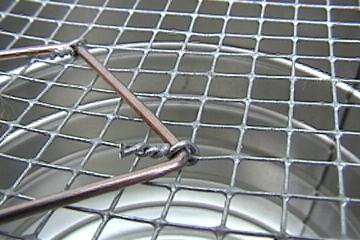
Secure each corner of the snapper, then lay your twists down flat against the screen so they don't get in the way when you set the trap.
Don't forget a couple twists of wire at the root of the snapper, to secure the screen there.

When you start trimming the wire around the edge of the can, notice that there's a minor issue right next to the trap. A portion of the screen has to be bent a bit so that it's actually inside the can. This is because it's beneath the hinge and is actually rotating outward when the trap closes. If you don't do this, thing's will bend weirdly when you try to open the screen to set the trap.

As you're securing things with the wire, you'll want to pay attention to where the retaining wire loops over the snapper. You can't let the screen obstruct its action. You can always trim out a piece of the mesh, if you need to.
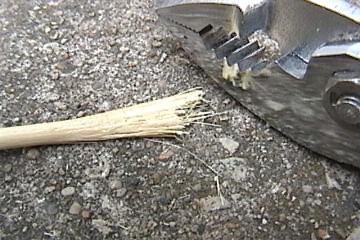
Whack on one end of the skewer piece. Shredding it a bit makes it hold your bait very well.

Note: Our infestation made it obvious what would make the best bait. The buggers had chewed on a Hershey's dark chocolate bar, among other things. I'll give 'em credit for good taste. So I used a lighter and melted a bit of the chocolate bar, applying it to the skewer along with some always-reliable peanut butter.

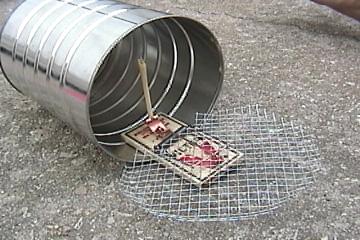
Insert the skewer piece in the trigger, and make final adjustments as needed. Smear just the top of the skewer with goodies, and leave the can in a tempting spot. Along a wall is always good. Inside a cupboard, as needed. On a pantry shelf, if your mice are climbers. Wherever you find their poop!
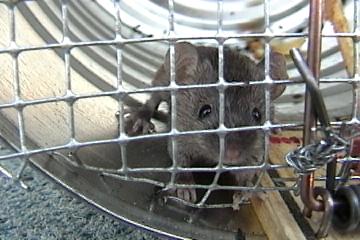
Snap!


This juvenile was caught in a larger coffee can trap

I heartily encourage suggestions!

E-mail me.


OK, so here's the feedback section.

I've had a lot of e-mail about the trap design, but not too many photos. Where the sender gives permission for their use, I'll post photos and comments below.

"Zen Seeker" sends this photo with remarks I'll summarize:

Zen built this for a friend who's apparently after rats -- an acid test for this design. "Ruggedizing" seems the objective of a few  mods: using "T" nuts to secure the trap to the can, wiring the bait stick to the trigger, setting the stick at an angle to get the animal deeper into the trap, as well as increase leverage on the trigger, adding some hemp fiber to the tip of the bait stick, using masking tape on the wire mesh to prevent injury to user or rat, adding a wooden board to keep the trap from rolling (nice handle!). He also "thought about adding graphics, neon beer signs, cheese lunch special signs, etc -better things came up this weekend."

:-)


Update: Not long after receiving the above picture from Zen, he sent a couple more. One is a handy side view, showing that he had not cut the trap in half, as I thought.


The second picture is the fun one, though. This critter's a bit bigger than the "micro-mouse" shown further above, in one of my own traps.  ;-)

Kudos to Zen for successfully scaling this trap to handle rats without needing to upsize to a large can.

The need for design changes to accommodate a rat prompted a thought. Rats may be too big for the coffee cans, even with the stick pointed backwards quite a bit (update: Zen has proven otherwise). They may get part-way in and trip it while their body is out far enough to prevent capture. Is there any way to get the rats further in? Here's a thought:

Bolt the trap to the back of the can. Run a hole through the trap and the can, and poke the bait stick through to the inside. make a hole behind the snapper for a light flexible wire, and run it through a loop to the door -- which would need to have hinges designed for it. Something like that.