This page will be updated from time to time.
Just now, here are some tease shots of the Open Sky roaster. Interior shots will be posted after the Roast-off event on August 26. (see below)
First, my humble market stall -- Open Sky Coffee:

Next, the charging port on the roaster. Dead center in the top of the grill. The cover for this port is a very sophisticated design, as you can see. ;-)
Here's a shot of the drop actuator. Twist, pull, and out come the beans:
Indeed, here they come! A shot from the rear of the roaster:
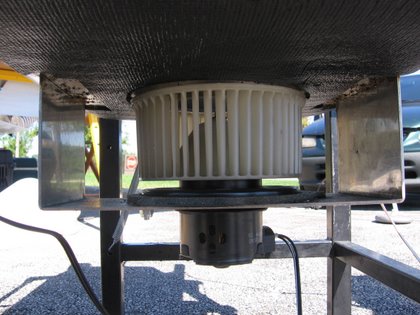
Here's the blower that cools the beans in a minute or two:
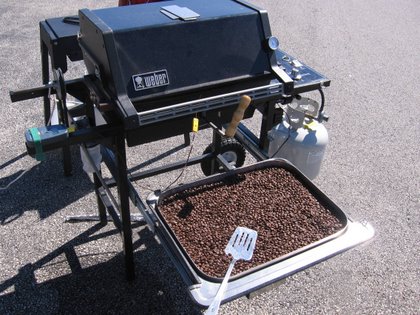
A smallish batch, this one. That's the stove for heating water in the back:
Roast-off! 8/26/06
It was a fun day. Many guest roasters showed up, bringing greens and rested roasts. We'll do it again next year, for sure.
But some pictures! Alas, I didn't get to take any good shots of the roaster during the event, but here are some I took a while back. In some cases, minor elements of the roaster will have changed since these pictures were taken.
Here's the thing folks have wondered about. The drum is split, with a stationary center ring that does a couple things really well. First, it allows for dropping the roast and charging while the drum is rotating -- continuous roasting. Second, it allows for easy placement of thermocouple probes, so they're constantly in the bean mass. The above picture is a bit obsolete; I no longer have two probes in the ring. But this shows how versatile the ring is -- mount as many probes as you want, of different kinds, to measure both bean and air temperatures.
The agitation vanes are discontinuous side to side; they don't meet in the middle. You could hold an arrow shaft through the ring from top to bottom while rotating and never encounter a vane. The vanes are angled to throw the beans from side to side. The vanes are angled even more severely at their inner ends, in order to jostle the bean mass that accumulates in the ring area. This mass has at least a two inch depth, providing for good TC placement. The mass rides up the front side of the drum with rotation, making placement of TC's in the front of the unit a simple thing. The mass also changes out fast -- no individual bean is in the mass for more than a couple seconds. I've been rotating the drum at 60 RPM, which amounts to four vane passes a second (two vanes each side, staggered). When the finished beans are dropped to the cooling tray, the vane design purges every single bean. We're still a bit surprised that only rarely will a defiant bean be left on the thin boundary of the lower surface of the ring to either side of the door.
This is a shot through the top hole in the ring, facing the right side of the roaster (I'm standing on the roaster's left to take the photo). The vane's direction of motion in this shot would be from left to right. Several things are visible in this shot. First, the closeness of the turning drum to the stationary ring. Second, the internal radius of the drum and the ring are identical. And though this can't be seen, everything is concentric. Avoiding eccentricity was difficult (especially with a guy like me involved in the project. ;-) These features are a credit to the precision work accomplished by my machinist (note the tiny welds at the perf's edge).
Third, the vanes rake back at a steeper angle where they cross over the ring. This throws the beans horizontally into the bean mass, moving other beans out to ensure the mass isn't static. Fourth, the vane has a cutout where its edge nears the ring surface; we found we'd constructed an effective coffee grinder at first. Fifth, the TC is in full view. Actually, two -- a stainless tube housing conventional TC wire on top, and a cheap temperature probe on the bottom. They look closer to the bottom of the ring than they are; there's at least 3/4" clearance from the ring surface.
Sixth, the bottom door is visible. When closed, it's a very close fit. Here's a shot from below, looking toward the front from the left rear of the machine:
The lowest element visible on the right is the actual door -- it swings down when the handle on the front of the roaster is twisted and pulled. Surrounding the door area are shields to prevent the beans from flowing sideways and potentially bouncing about among the burner shields. The tab on the end of the door is its stop when closed. The back shield in this area extends a bit lower (on the left), to prevent the beans from flowing too far to the rear of the cooling tray. The pitch of the open door is limited by its contact with the burner shields (darkly visible to the right of the door), and is too steep for beans to hang.
A key problem with the roaster may be inferred from the above photo; the drum is too close to the burners. Although the burner shields prevent damage to the beans, it's possible that MET is sometimes surpassed for some beans. That comes of my greed for a huge drum! We had to lower the burners a couple inches, and that produced another problem -- the machine's reliable delivery of BTUs is challenged by wind, which creates troublesome turbulence around the bottom opening of the grill. In the prototype, I'm resorting to external shielding of this area to help with that.
I've learned a lot with this roaster so far this season. Prototype quirks and ongoing tweaks aside, my general impression has been that the roaster performs excellently. Roasts are very consistent, though just this weekend while lying on my back under a live roast (!) I observed something that may explain why I've had some rare inconsistent batches.
A word about electrical power. During the roast-off event on 8/26/06, the roaster was operated more than usual, and the grinder was operated a LOT more than usual for the market. I measured the car battery responsible for powering all this, and noticed that it had barely dropped. Amazing, but true. I can roast and grind for hours and never worry about the battery losing its edge. That's nice to know!
One other thing: three times, the roaster has taken a spill during transportation. The whole grill just tipped over in the vehicle, crashing to the floor of the van (right, no tie-downs -- dumb, I know). This, of course, freaked me out each time. I'd fear the worst. Amazingly, however, there was no damage to the drum assembly (did I mention it constitutes a framework that just lifts out of the grill entirely, in one piece?), nor the grill. I hadn't thought of TESTING how well it takes abuse, but I now have evidence that the thing at least can survive random idiocy. ;-)
A production model of this roaster -- designed for unpowered farmer's market use but obviously by reason of such versatility suited for any use at all -- would be quite a bit different than the prototype. The fundamental drum design would remain unchanged, but lessons learned from the prototype would be thoroughly integrated into a re-worked design (for example, we'd use a larger main shaft -- the half inch flexes a bit, which makes tweaking clearances a bit of a challenge). The limitations of a grill would not be in play, because a far superior (and less expensive) burner assembly would be used. The few caveats this prototype has presented -- and they are few -- would be eliminated to the extent possible in a production unit. Chaff and smoke control are not likely to be design priorities, based on market experience. This means that other use of such a roaster might leave the operator wishing for stronger design in those areas, but they also happen to be difficult and expensive concerns to address. Although we'll work on these areas, for a farmer's market a 100% solution for them just isn't crucial.
These comments should not be construed as a commitment to production -- yet. (edit: this roaster design is in pre-production; serial number 0001 is spoken for) The work is expensive, and I'm not in a position to be aware of my machinist's production schedule (his work ranges from modifying huge diesel engines to fabricating tiny gears for custom model trains -- and everything in between). But it's fair to say that if anyone wanted such a roaster, it'd be seriously considered. My role in all this is that of designer and tester. With that said, Erik's advice is evident in some of the coolest aspects of the roaster -- to cite just two examples, the way the bottom door opens, and the way the cooling tray comes out on rails. On the other hand, you won't see pictures of some crazy notions we tried that didn't work!. If you're ever at the market, I can show you some marks on the drum and tell the tale. If we're to be credited for success with the thing, I'd say we also deserve a chuckle or two for some of our gaffes along the way. ;-)
Finally, here's the Open Sky logo -- atop the canopy as a sign for the first time at the roast-off . And yes, those are coffee beans making up the letters.
More to come . . .


